You already understand how frustrating it is to have excessive energy bills due to an outdated storage tank heater. A tried-and-true solution is tankless water heaters. According to Energy.gov, they can reduce energy consumption for typical families by 24% to 34%, heat water on demand, and last up to twice as long as conventional tanks. Whether to switch is not the question. It’s about doing it correctly.
Learning how to install tankless water heater units correctly requires planning, the right tools, and attention to local codes. Whether you’re going with a gas or electric model, this guide walks you through everything, from sizing and cost to step-by-step installation for both types. No fluff, no filler. Just what you actually need to get the job done safely.
Key Takeaways
- Tankless water heaters provide hot water on demand with no storage tank.
- Gas models require a gas line upgrade, proper venting, and a sediment trap.
- Electric models need high-amperage circuits, correct breaker sizes, and 6-gauge copper wiring.
- Always install a pressure relief valve and check for leaks before startup.
- Pull permits and follow the National Fuel and Gas Code or National Electrical Code for your region.
- Professional installation is strongly recommended for gas units.
Understanding Tankless Water Heaters
A tankless water heater heats water only when you need it. When you turn on a hot water faucet, a flow sensor detects the movement and activates the heat exchanger. Cold water passes through it and reaches the right temperature almost instantly.
Gas models utilise a burner along with a heat exchanger made of copper or stainless steel. Electric models depend on heating elements. Both types bypass the storage tank completely, which is the primary reason they are more energy-efficient compared to traditional heaters.
There are two main types to know:
- Non-condensing: single heat exchanger, lower upfront cost, requires metal venting.
- Condensing: two heat exchangers (copper + stainless steel), extracts more heat from exhaust gases, achieves 90%+ thermal efficiency, and qualifies for ENERGY STAR certification.
Quick Sizing Reference (UEF Rating & Flow Rate)
| Usage Level | Daily Gallons | Max GPM (Tankless) |
| Very Small | 10 gallons | Less than 1.7 GPM |
| Low | 38 gallons | 1.7 to 2.8 GPM |
| Medium | 55 gallons | 2.8 to 4.0 GPM |
| High | 84 gallons | 4.0 GPM or more |
Advantages of a Tankless Heater
The biggest draw is simple: you never run out of hot water as long as you don’t exceed the unit’s flow rate. But that’s just the start.
- Lifespan: Tankless units typically last over 20 years. Traditional tanks average 10 to 12 years.
- Energy savings: 24% to 34% more efficient for low-to-average usage homes (Energy.gov).
- Space savings: Wall-mounted and compact. Some models are rated for outdoor installation, which simplifies venting for gas units.
- Reliability: Most components are replaceable. Controllers feature self-diagnostic systems.
- ENERGY STAR certified models achieve at least 90% thermal efficiency and may qualify for utility rebates.
Consider it as a comparison between a gas cooker and a slow cooker. The storage tank heater maintains a warm water supply throughout the day, ensuring it’s available when needed. A tankless unit activates only when it is truly required. The energy savings originate from that point.
Before You Begin: Things to Consider
Rushing into tankless water heater installation without planning is the fastest way to fail inspection or create a safety hazard. Take time to assess these factors first.
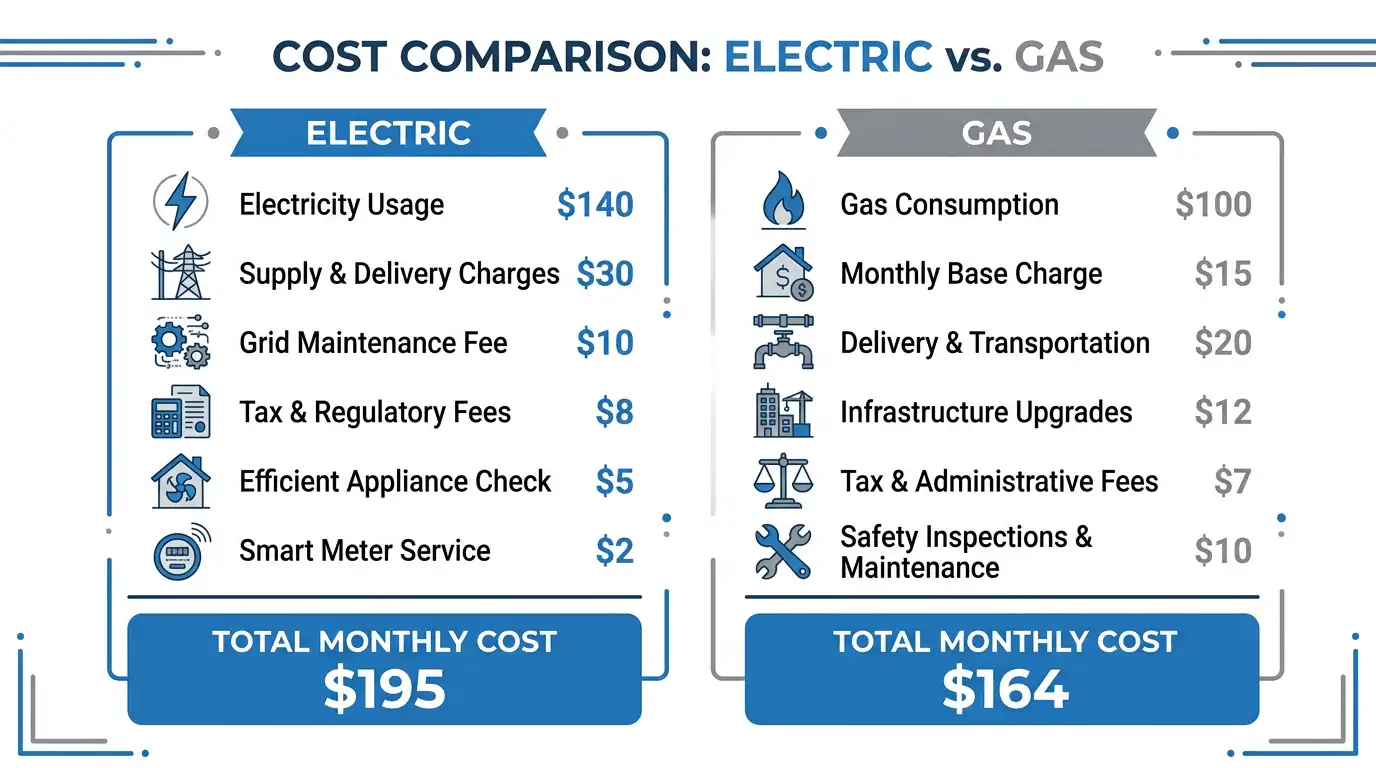
Gas vs. Electric: Which Is Right for You?
| Factor | Gas Tankless | Electric Tankless |
| Upfront Cost | Higher ($1,000–$3,500+) | Lower ($500–$1,500) |
| Operating Cost | Lower (gas is cheaper/BTU) | Higher in most regions |
| BTU Input | 90,000–199,000 BTU/h | 12.2 kW to 32 kW |
| Venting Required | Yes (exhaust + air intake) | No |
| Gas Line Upgrade | Usually needed | Not applicable |
| Electrical Upgrade | Minor (outlet only) | Major (high-amperage circuit) |
| Best For | High demand / larger homes | Low-medium demand / small homes |
Sizing: Calculate Your Flow Rate (GPM)
Add up the GPM of every fixture that might run at the same time. A shower uses roughly 2.0 GPM. A kitchen faucet uses about 1.5 GPM. A dishwasher uses around 1.5 GPM. For a household that might run two showers plus a kitchen faucet simultaneously, you need a unit rated for at least 5.5 GPM.
It’s smarter to slightly oversize. A unit that’s too small won’t consistently deliver hot water during peak demand.
Permits and Code Compliance
Most municipalities require a permit for tankless water heater installation. Don’t skip this. Unpermitted work can void your homeowner’s insurance and create problems when you sell.
- Gas installs: Must comply with ANSI Z223.1/NFPA 54 (USA) or B149.1 (Canada).
- Electric installs: Must meet National Electrical Code NFPA 70 (USA) or CSA C22.1 (Canada).
- Some states require low NOx emission compliance for gas units.
- LEED-rated buildings may qualify for additional tax incentives.
Tools and Materials Checklist
Before you start, gather everything you’ll need.
- Pipe wrench and adjustable wrench
- Voltage tester and multimeter
- Pipe cutter and deburring tool
- Solder, flux, and propane torch (for copper pipe work)
- Drill and masonry anchors (for wall mounting)
- Teflon tape and gas-rated thread sealant
- Gas leak detector or soapy water solution
- Flexible water supply lines
- Pressure relief valve (rated 150 psi)
- Thermostatic mixing valve (recommended)
- Isolation valves and manual shutoff valves
How to Install an Electric Tankless Water Heater
Electric tankless water heater requirements are simpler than gas, but the electrical demands are significant. Most whole-home units draw between 51 and 133 amps at 240 volts. Your panel must have the capacity before you begin.
Recommended wiring: 6-gauge copper wire rated at 65 amps. Some smaller models allow 8-gauge, but always check the installation manual. Breaker sizes typically range from 40 to 70 amps per circuit. Larger 32 kW units need two double-pole breakers.
Step 1: Shut Off Power and Water
Switch off the circuit breaker feeding your old water heater. Run a nearby faucet until the water runs cold. Use a voltage tester to confirm all power is off. Some older tanks have more than one breaker.
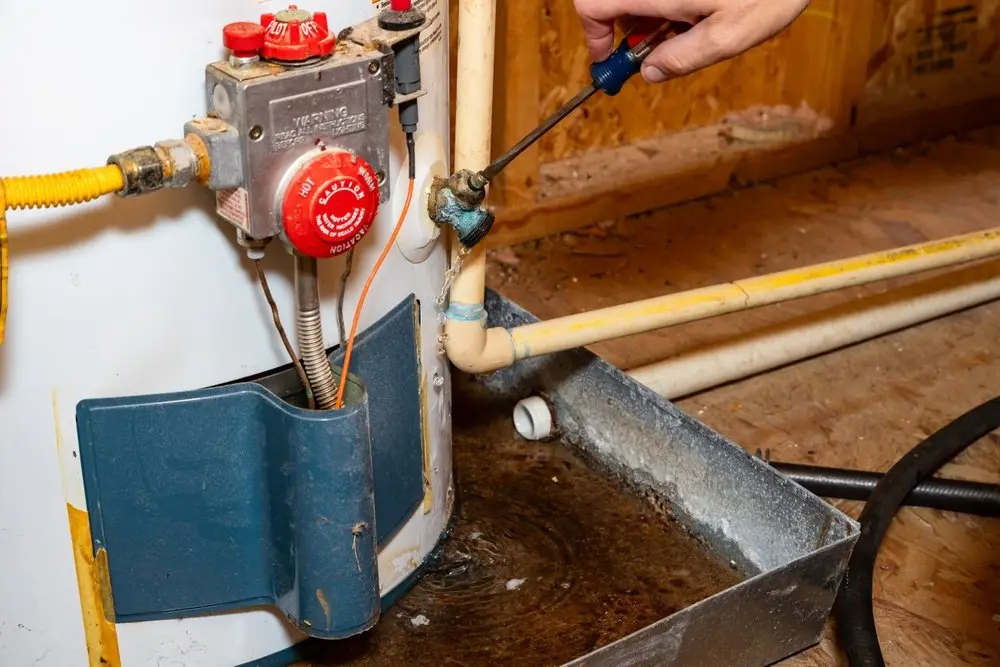
Step 2: Drain and Remove the Old Tank
Connect a garden hose to the drain valve at the bottom of the old tank. Open a hot water faucet to prevent a vacuum, then drain fully. Disconnect the water lines and electrical connections. Move the old unit to a recycling center or local scrapyard.
Step 3: Choose and Prepare the Location
Mount the new unit as close as possible to the point of use. For whole-home applications, a central location works best. Check required clearances in the installation manual before drilling.
Step 4: Mount the Water Heater
Remove the front cover. Disconnect the user interface display before pulling the cover fully off. Mount the unit on the wall using the supplied standoffs and appropriate anchors for your wall type.
Step 5: Connect the Water Lines
Connect the cold water inlet and hot water outlet using flexible supply lines. This reduces stress on the heater connections. If your water pressure is above 80 psi, install a pressure-reducing valve on the inlet side.
Step 6: Install the Temperature and Pressure Relief Valve
Install a T&P relief valve where required by local ordinance. A thermostatic mixing valve is also recommended to prevent scalding, especially in homes with children or elderly residents.
Step 7: Purge Air From the Lines
Turn on the water supply slowly. Open all hot water faucets connected to the unit and let water flow until there are no more air bubbles. This protects the heating elements from running dry.
Step 8: Wire the Electrical Connection
Refer to the manual for wire gauge and breaker sizing. Turn off the main supply to the breaker panel before working. Install the required breakers, run wiring to the unit, and ensure you have a solid ground connection. Follow NFPA 70 or CSA C22.1 as applicable.
Step 9: Reattach the Cover and Power On
Reconnect the user interface display. Insert the ribbon cable in the correct orientation. Reattach the front panel. Do a final check: water connections tight, panel secured, wiring secure. Energize the circuit and follow the startup procedure in the owner’s manual.
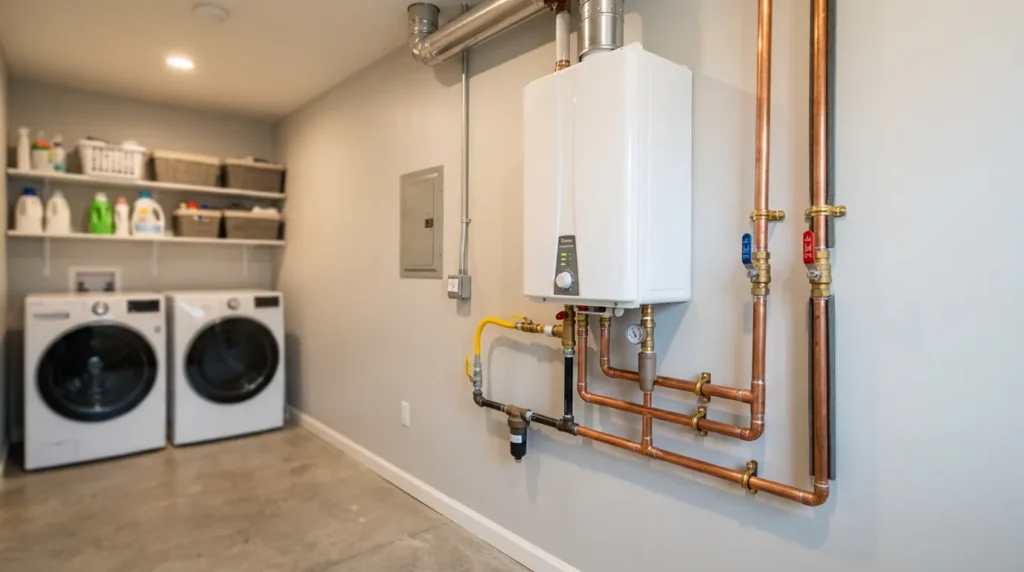
How to Install a Gas Tankless Water Heater
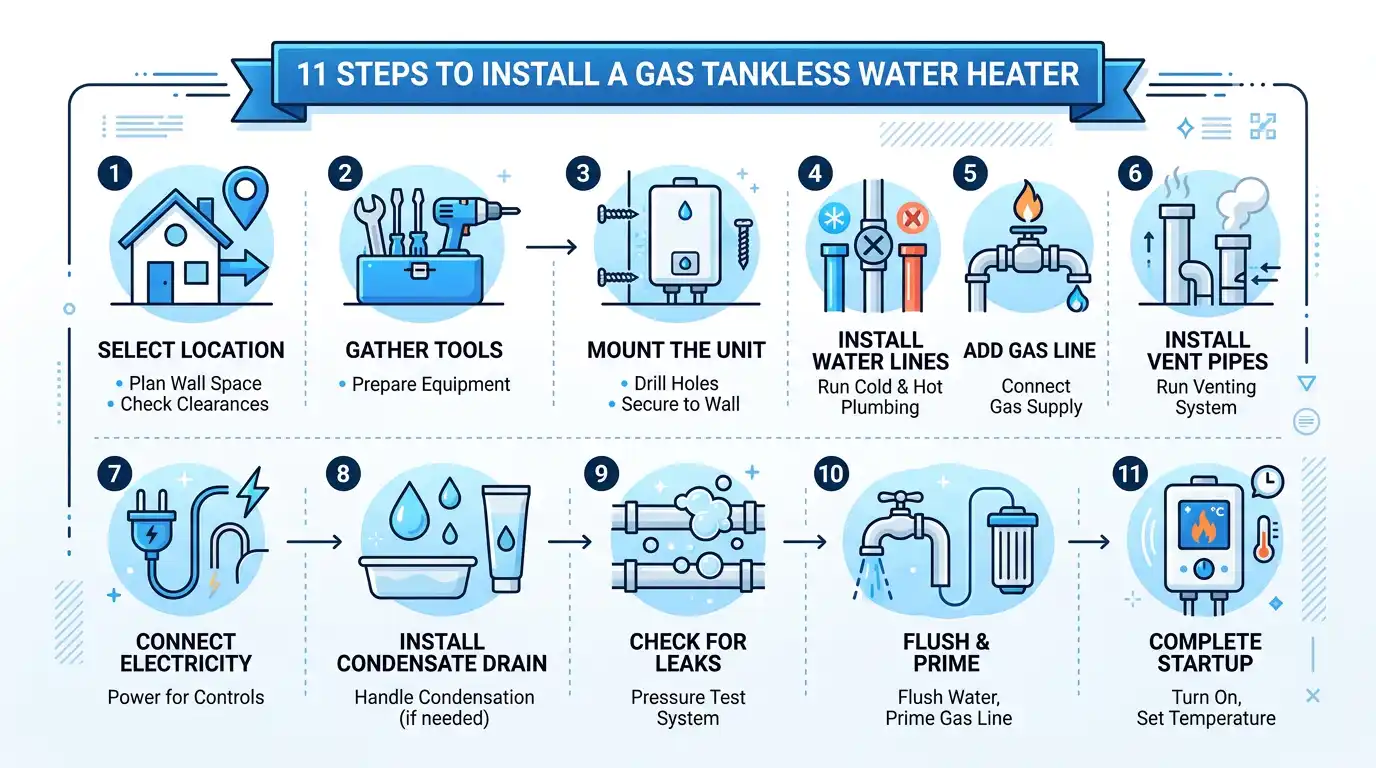
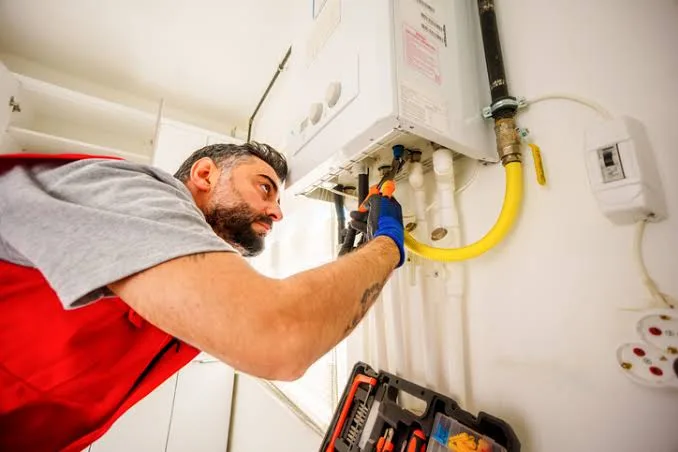
Gas tankless water heater installation is more complex than electric. Improper venting or gas connections create serious risks including fire, carbon monoxide poisoning, and explosion. Unless you are a qualified installer, hire a licensed contractor for the gas line and venting portions.
A gas tankless unit can require 90,000 to 199,000 BTU/h. That’s more than most home furnaces. This almost always means upgrading your gas line, often jumping from 1/2-inch to 1-inch pipe from the meter.
Step 1: Shut Off Gas and Water
Close the main gas supply shutoff valve. Close the water supply at the nearest stopcock valve. Never start work with the gas live.
Step 2: Upgrade the Gas Line (If Needed)
Check your current gas line size against the unit’s BTU requirements. In most cases when replacing a water heater with tankless, you’ll need to run a larger line from the meter. This step must be handled by a licensed contractor.
Specify whether your unit runs on natural gas or propane. The combustion requirements differ. Propane delivers more heat output per cubic foot, but natural gas is generally less expensive.
Step 3: Plan the Venting System
Tankless gas units vent directly to the outside. They cannot use a conventional masonry chimney because the flue gas temperature is too low. Most units use either concentric venting (combined inlet and exhaust in one pipe) or separate inlet and exhaust vents.
- Concentric vents require a condensate trap.
- Never reuse old vent lines.
- Keep vent runs as short as possible.
- Observe minimum clearances from windows, doors, and air intake devices.
- Both horizontal sidewall and vertical roof terminations are permitted.
Step 4: Remove the Old Tank
Drain the old tank. Disconnect and cap the gas line at the union fitting. Disconnect water lines. Remove the old unit and dispose of it at a recycling facility.
Step 5: Mount the New Unit
Choose a location with the required horizontal and vertical clearances. Fasten the unit securely to the wall. Note: outdoor-rated units cannot be installed indoors.
Step 6: Connect the Gas Line
Install a gas shutoff valve between the supply line and the heater. Add a sediment trap to prevent debris from reaching the gas burner. Use thread sealant rated for gas lines on all threaded connections, not standard Teflon tape.
Step 7: Install the Water Lines
Install a manual shutoff valve on the cold-water line. Flush the water line before connecting it to the heater to clear any debris. Connect the inlet and outlet lines. A thermostatic mixing valve is strongly recommended to prevent scalding.
For recirculation systems, add an appropriately sized expansion tank on the cold-water recirculation line, along with check valves.
Step 8: Install the Pressure Relief Valve
The pressure relief valve is mandatory for gas installations. Install it directly after the hot water outlet. It must be rated for 150 psi. Run discharge piping to a floor drain.
Step 9: Check for Leaks
Turn on the water line and inspect every connection. Turn on the gas line and check every gas fitting with a gas leak detector or soapy water. Look for bubbles at joints. Do not proceed until the system is completely leak-free.
Step 10: Install the Exhaust Vent
Install the vent system according to the manufacturer’s specifications. Indoor units also need an air intake vent. Follow the clearance requirements exactly. Never improvise with vent routing.
Step 11: Purge Air and Start Up
Turn the water supply back on. Open all hot water faucets and run until air bubbles stop. Turn the gas back on. Close the circuit breaker. Set DIP switches per the manual. Press the power button and test with a live hot water faucet.
Common Mistakes to Avoid During Installation
Both competitors miss this section entirely. These are the errors that lead to failed inspections, void warranties, or create safety hazards.
- Undersizing the unit: Always calculate GPM needs for simultaneous use. A unit that falls short won’t recover fast enough.
- Skipping the sediment trap on gas lines: Debris in the burner is a common cause of early failure.
- Using old vent lines for a new gas unit: Condensing units produce cooler flue gases that condense in old metal vents and cause corrosion.
- Not purging air from water lines: Running elements or a heat exchanger dry causes instant damage.
- Ignoring water pressure: Pressure above 80 psi without a pressure-reducing valve will shorten the lifespan of any tankless unit.
- Skipping permits: Unpermitted installations can void your homeowner’s insurance.
- Forgetting freeze protection: In cold climates, outdoor-rated units or units in unheated spaces need freeze protection kits or heat tape.
How Much to Install a Tankless Water Heater?
Tankless water heater installation costs range from $800 to $3,500 or more depending on fuel type, unit size, and the scope of upgrades needed. Gas models cost more to install than electric units due to venting requirements and potential gas line upgrades, but typically have lower long-term operating costs.
| Cost Item | Electric | Gas |
| Unit cost | $300–$900 | $700–$2,000 |
| Basic labor | $150–$400 | $300–$700 |
| Gas line upgrade | N/A | $300–$800+ |
| Electrical upgrade | $200–$500 | $100–$200 (outlet) |
| Venting system | N/A | $200–$600 |
| Permits | $50–$200 | $50–$200 |
| Total (estimated) | $800–$2,000 | $1,500–$3,500+ |
Note: Costs vary by region. Contact local certified plumbing contractors for accurate quotes.
Converting from a tank to a tankless system almost always involves extra costs. Budget for gas line and electrical upgrades before committing to a unit. The operating savings typically offset the higher installation cost within 5 to 8 years.
Post-Installation Maintenance Tips
A tankless unit that lasts 20+ years needs periodic maintenance. Here’s what to schedule.
- Annual descaling: Flush the heat exchanger with a descaling solution (white vinegar works) to remove mineral buildup, especially in hard water areas. Some units like A.O. Smith models with X3 Scale Prevention Technology reduce or eliminate this step.
- Inlet filter cleaning: Check and clean the cold water inlet screen filter every 6 to 12 months.
- Vent inspection (gas): Check the exhaust vent and air intake for debris, nesting, or blockage annually.
- Leak check: Inspect water and gas connections for signs of corrosion or seepage once a year.
- Self-diagnostics: Most modern units have self-diagnostic controllers. Note any error codes and address them promptly.
Ready to Install Your Tankless Water Heater?
Now you know how to install tankless water heater units step by step, what the costs look like, and the mistakes that trip up most DIYers. If you feel comfortable with the plumbing side, an electric model is manageable for an experienced DIYer. A gas installation, though, is a different story. Gas line work, venting, and code compliance are best left to a licensed professional.
If you’re located in Southern California and want the job done right the first time, our team at Hutchinson Heating and Air handles complete tankless water heater installation with full code compliance, permitting, and warranty support.
We specialize in heater installation services in Temecula & Murrieta and surrounding areas. Whether you’re replacing a water heater with tankless or installing fresh, we’re ready to help.
Frequently Asked Questions About Tankless Water Heater Installation
Can I install my own tankless water heater?
You can install an electric tankless water heater yourself if you have solid electrical and plumbing knowledge and follow local codes. Gas installations are more hazardous and require proper venting, gas line connections, and permits. Most experts strongly recommend hiring a licensed contractor for gas unit installations to avoid safety risks and warranty issues.
How long does tankless water heater installation take?
A straightforward electric replacement takes 2 to 4 hours. A gas installation with a new gas line, vent system, and plumbing connections can take a full day or more. Factor in additional time if inspections are required before and after.
Do I need to upgrade my gas line?
In most cases, yes. Tankless gas heaters require 90,000 to 199,000 BTU/h. A typical storage tank uses 30,000 to 40,000 BTU/h. That’s usually enough of a jump to require upgrading from 1/2-inch to 1-inch gas pipe from the meter. A licensed gas contractor should assess and handle this.
What are the electric tankless water heater requirements?
Electric tankless water heater requirements include a dedicated 240-volt circuit, correctly sized double-pole breakers (40 to 70 amps depending on the unit), and 6-gauge copper wiring for most whole-home models. Smaller 12.2 kW units draw around 51 amps. Larger 32 kW units draw up to 133 amps and need two separate circuits.
Do tankless water heaters need special plumbing?
Yes. You’ll need a manual shutoff valve on the cold-water line, a pressure relief valve rated for 150 psi, and isolation valves for servicing. If water pressure exceeds 80 psi, add a pressure-reducing valve. For recirculation systems, an expansion tank and check valves are also required.
What is the downside of a tankless water heater?
The main downsides are higher upfront cost and more complex installation compared to a storage tank. Gas models may struggle to supply multiple fixtures simultaneously if undersized. Electric models need significant electrical capacity. In very cold climates, outdoor units require freeze protection.